
建站笔记(七)
博客管理
本文将从功能来进行讲述,分别有博客新增、查询,删除,编辑修改,搜索博客功能,这里会有比较多的多表查询,SQL会稍微复杂点。
一、搭建MVC结构
先将MVC架构模型搭建出来,后面再直接根据功能编写各模块代码,创建如下包、类、接口:
- dao包下持久层接口BlogDao:
package com.cbx.dao;

import org.apache.ibatis.annotations.Mapper;
import org.springframework.stereotype.Repository;

@Mapper
@Repository
public interface BlogDao {

}
- mapper文件夹下:BlogDao.xml:
<?xml version="1.0" encoding="utf-8" ?>
<!DOCTYPE mapper PUBLIC "-//mybatis.org//DTD Mapper 3.0//EN" "http://mybatis.org/dtd/mybatis-3-mapper.dtd" >
<mapper namespace="com.cbx.dao.BlogDao">

</mapper>
- service包下BlogService接口:
package com.cbx.service;


public interface BlogService {

}
- Impl包下BlogServiceImpl接口实现类:
package com.cbx.service.Impl;

import com.star.service.BlogService;
import org.springframework.stereotype.Service;


@Service
public class BlogServiceImpl implements BlogService {

}
接下来就直接根据功能来填充各模块代码了
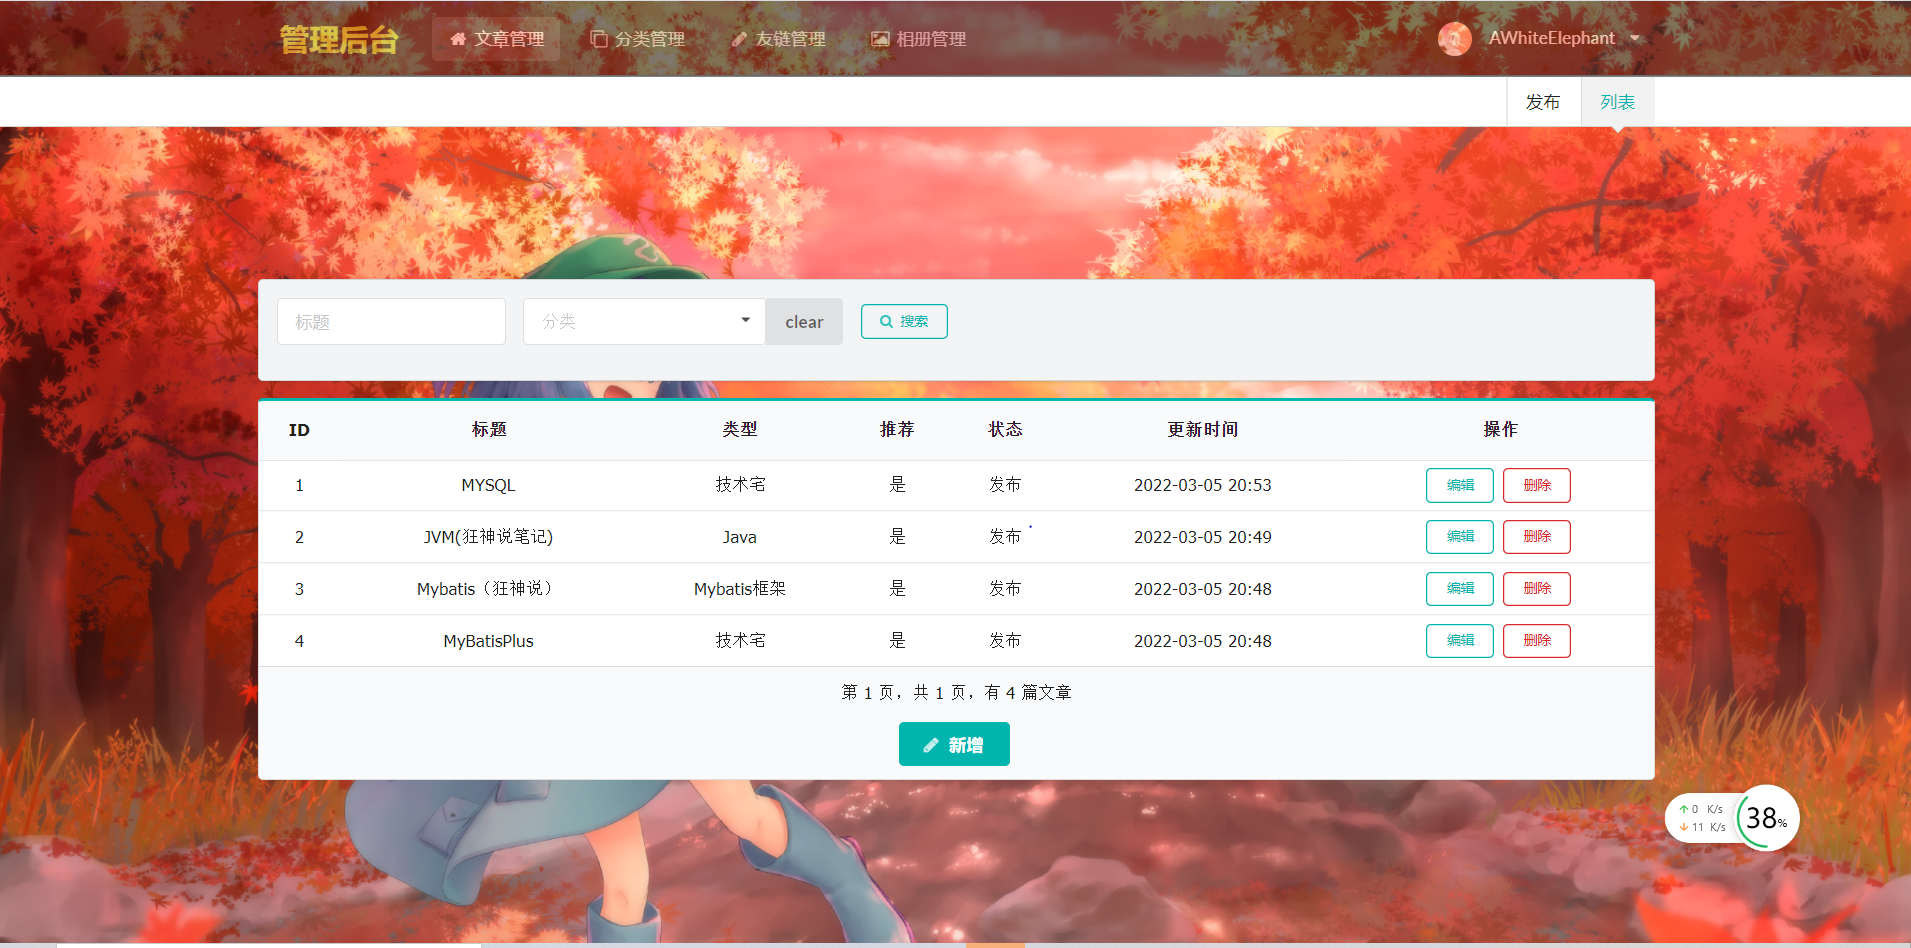
二、博客新增、列表查询
新增博客包括标题、内容、分类、首图地址、博客描述,推荐、转载、赞赏、评论、原创等设置,新增后发布,在后台可以展示博客列表,这里就要进行博客列表查询了,和之前有重复的知识点就不再提了,新出现的知识点会进行讲解,这里最主要的就是多表查询了。
分析:
问:在查询文章列表的时候,前端页面需要显示分类名称,但博客数据表没有分类字段,这个要如何处理?
答:这里就要用到Mybatis的多表查询了,可以通过建立实体类的方式,在mapper定义专门的resultMap用于映射多对一的关系
1. 创建查询实体类
在com.cbx包下创建queryvo包,创建BlogQuery查询列表实体类,根据需要查询的内容来定义变量,有:主键(id)、标题(title)、更新时间(updateTime)、是否推荐(recommend)、是否发布(published)、分类id(typeId)、分类(type),如下:
package com.cbx.queryvo;

import com.cbx.entity.Type;
import lombok.AllArgsConstructor;
import lombok.Data;
import lombok.NoArgsConstructor;

import java.util.Date;

/**
 * @author cbx
 * @date 2022/3/3
 * @apiNote 查询博客列表 显示数据实体类
 * resultMap属性:用于映射查询结果,这里定义封装BlogQuery的resultMap
 * association属性:用于一对一和多对一的关系,把Type实体映射从association元素中提取出来,用一个resultMap元素表示
 * property属性:关联查询的结果集存储在BlogQuery对象哪个属性上
 * javaType属性:用来指定对象所属的java数据类型
 */
@Data
@NoArgsConstructor
@AllArgsConstructor
public class BlogQuery {

    private Long id;
    private String title;
    private Date updateTime;
    private Boolean recommend;
    private Boolean published;
    private Long typeId;
    private Type type;

}
2. 新增、查询列表持久层接口
在BlogDao下添加接口:
//保存新增博客
int saveBlog(Blog blog);

//查询文章管理列表
List<BlogQuery> getAllBlogQuery();
3. 新增、查询列表mapper:
在BlogDao.xml添加SQL
<!--新增保存文章-->
<insert id="saveBlog" parameterType="com.cbx.entity.Blog">
    insert into myblog.t_blog (id,title, content, first_picture, flag,
    views, comment_count, appreciation, share_statement, commentabled, published,
    recommend, create_time, update_time, type_id, user_id, description)
    values (#{id},#{title},#{content},#{firstPicture},#{flag},#{views},#{commentCount},#{appreciation},
    #{shareStatement},#{commentabled},#{published},#{recommend},#{createTime},
    #{updateTime},#{typeId},#{userId},#{description});
</insert>

<!--查询文章管理列表多对一配置-->
<resultMap id="blog" type="com.cbx.queryvo.BlogQuery">
    <id property="id" column="id"/>
    <result property="title" column="title"/>
    <result property="updateTime" column="update_time"/>
    <result property="recommend" column="recommend"/>
    <result property="published" column="published"/>
    <result property="typeId" column="type_id"/>
    <association property="type" javaType="com.cbx.entity.Type">
        <id property="id" column="id"/>
        <result property="name" column="name"/>
    </association>
</resultMap>
<!--查询文章管理列表-->
<select id="getAllBlogQuery" resultMap="blog">
    select b.id,b.title,b.update_time,b.recommend,b.published,b.type_id,t.id,t.name
    from myblog.t_blog b left outer join
    myblog.t_type t on b.type_id = t.id order by b.update_time desc
</select>
多表查询讲解:
- resultMap属性:用于映射查询结果,这里定义封装BlogQuery的resultMap
- association属性:用于一对一和多对一的关系,把Type实体映射从association元素中提取出来,用一个resultMap元素表示
- property属性:关联查询的结果集存储在BlogQuery对象哪个属性上
- javaType属性:用来指定对象所属的java数据类型
4. 新增、查询列表业务层接口
在BlogService接口下添加:
//保存新增博客
int saveBlog(Blog blog);

//查询文章管理列表
List<BlogQuery> getAllBlog();
5. 新增、查询列表业务层接口实现类
在BlogServiceImpl接口实现类下添加:
@Autowired
private BlogDao blogDao;

//保存新增博客
@Override
public int saveBlog(Blog blog) {
    blog.setCreateTime(new Date());
    blog.setUpdateTime(new Date());
    blog.setViews(0);
    blog.setCommentCount(0);
    return blogDao.saveBlog(blog);
}

//查询文章管理列表
@Override
public List<BlogQuery> getAllBlog() {
    return blogDao.getAllBlogQuery();
}
讲解:
- 注意:在新增博客中需要初始化创建时间、更新时间、浏览数量、访问数量
- 调用持久层接口实现相关功能
6. 新增、查询列表控制器
分析:
问:控制器要如何去编写,直接做页面跳转就行吗?
答:做页面跳转的时候首先要思考需要传递哪些数据(model)给前端,光做页面跳转肯定是不行的
问:新增博客需要传递哪些model
答:博客新增后,会跳转到博客列表,需要传递博客对象和分类的信息, 因此除了博客的model还需要Type相关model
在admin包下的BlogController类中添加控制器代码:
 	@Autowired
    private BlogService blogService;

    @Autowired
    private TypeService typeService;

    // 跳转博客新增页面
    @GetMapping("/blogs/input")
    public String input(Model model){
        model.addAttribute("types",typeService.getAllType() );
        model.addAttribute("blog",new Blog());
        return "admin/blogs-input";
    }

    // 博客新增
    @PostMapping("/blogs")
    public String post(Blog blog, RedirectAttributes attributes, HttpSession session){
        // 新增的时候需要传递Blog对象,Blog对象需要有user
        blog.setUser((User) session.getAttribute("user"));
        // 设置blog的type
        blog.setType(typeService.getType(blog.getTypeId()));
        // 设置blog中的typeId属性
        blog.setTypeId(blog.getType().getId());
        // 设置用户id
        blog.setUserId(blog.getUser().getId());

        int b = blogService.saveBlog(blog);
        if (b == 0){
            attributes.addFlashAttribute("message","新增失败");
        }else {
            attributes.addFlashAttribute("message","新增成功");
        }
        return "redirect:/admin/blogs";
    }

    // 博客列表
    @RequestMapping("/blogs")
    public String blogs(Model model, @RequestParam(defaultValue = "1",value = "pageNum")Integer pageNum){

        // 按照排序字段 倒序 排序
        String orderBy = "update_time desc";
        PageHelper.startPage(pageNum,10,orderBy);
        List<BlogQuery> list = blogService.getAllBlog();
        PageInfo<BlogQuery> pageInfo = new PageInfo<>(list);
        model.addAttribute("types",typeService.getAllType());
        model.addAttribute("pageInfo",pageInfo);
        return "admin/blogs";
    }
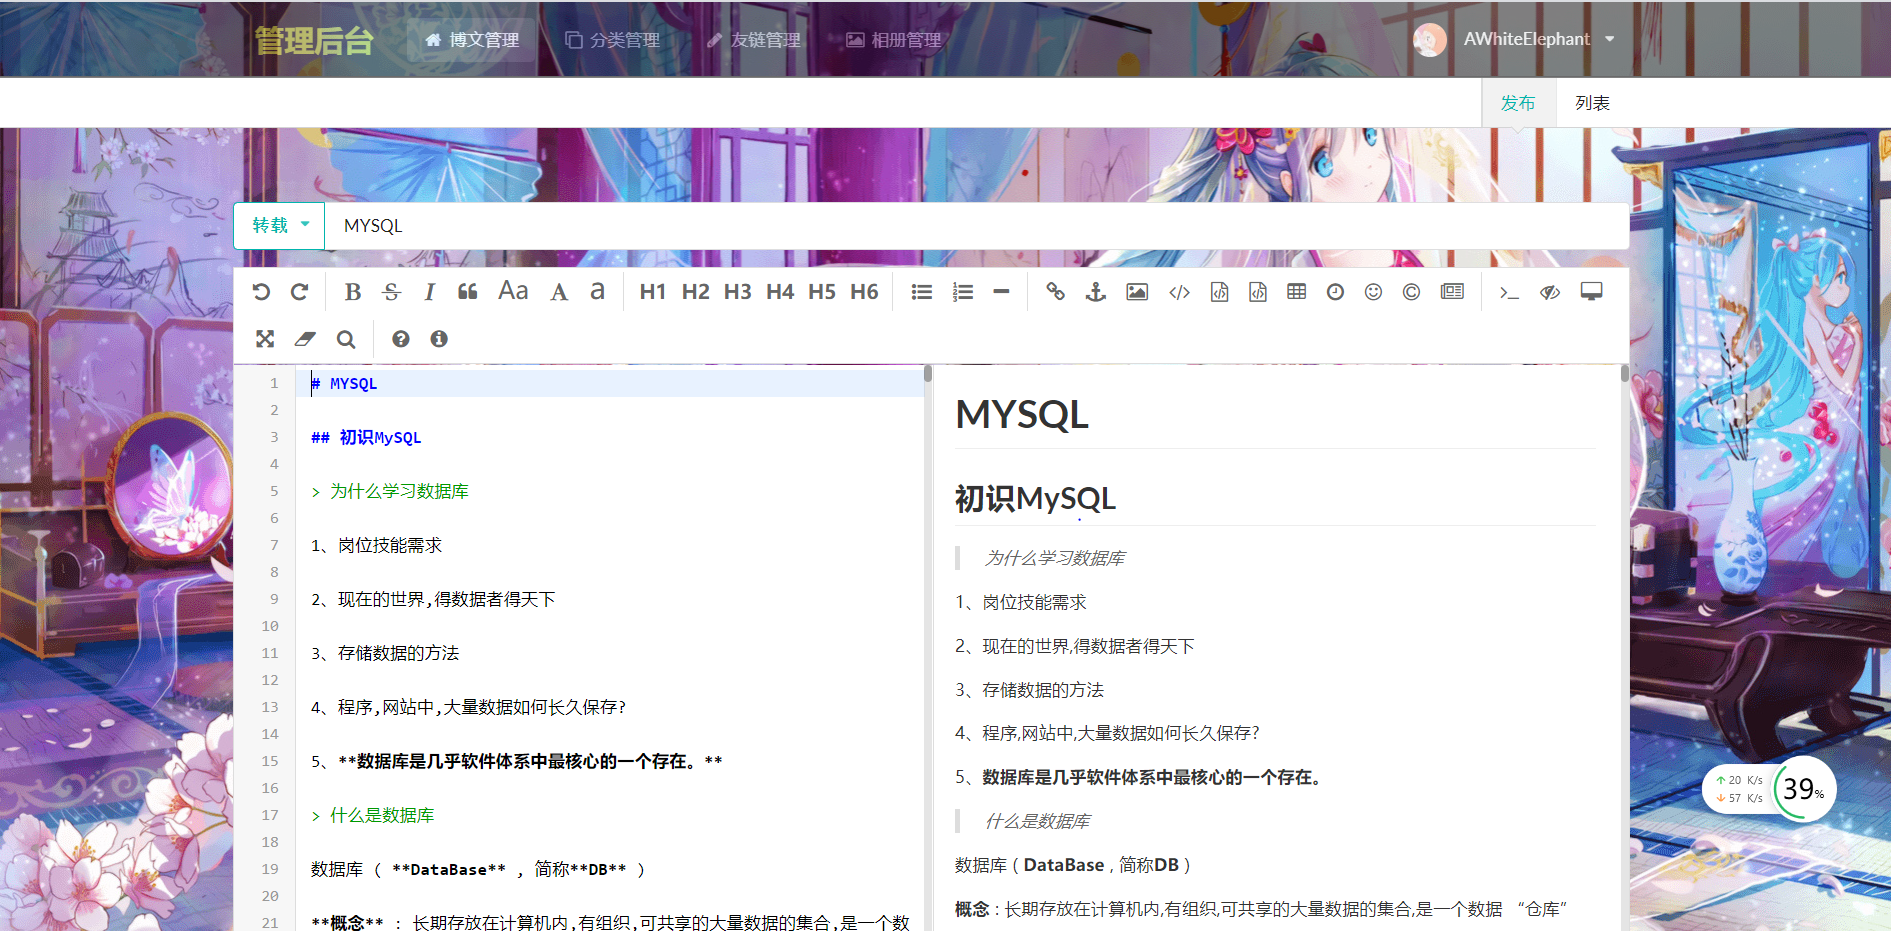
7. 前后端交互
- 新增博客:
<a href="#" th:href="@{/admin/blogs/input}">
  <button type="button" class="ui teal button m-mobile-wide m-margin-top"><i class="pencil icon"></i>新增</button>
</a>
- 新增内容
<!--标记原创、转载、翻译-->
<input type="hidden" value="原创" name="flag" th:value="*{flag}== null?'原创':*{flag}" >

<!--博客标题-->
<input type="text" name="title" placeholder="标题" th:value="*{title}">

<!--博客正文-->
<div class="" id="md-content" style="z-index: 1 !important;">
    <textarea placeholder="博客内容" name="content" style="display: none" th:text="*{content}"></textarea>
</div>

<div th:each="type : ${types}" class="item" data-value="1" th:data-value="${type.id}"th:text="${type.name}">我的故事</div>


<!--首图设置-->
<input type="text" name="firstPicture" th:value="*{firstPicture}" placeholder="首图引用地址">

<!--博客描述-->
<textarea name="description" placeholder="博客描述..." maxlength="200" th:text="*{description}"></textarea>

<!--推荐设置-->
<input type="checkbox" id="recommend" name="recommend" checked th:checked="*{recommend}" class="hidden">

<!--转载声明-->
<input type="checkbox" id="shareStatement" name="shareStatement" th:checked="*{shareStatement}" class="hidden">

<!--赞赏设置-->
<input type="checkbox" id="appreciation" name="appreciation" th:checked="*{appreciation}" class="hidden">

<!--评论设置-->
<input type="checkbox" id="commentabled" name="commentabled" th:checked="*{commentabled}" class="hidden">
- 保存发布:
<button type="button" id="save-btn" class="ui secondary button">保存</button>
<button type="button" id="publish-btn" class="ui teal button">发布</button>
$('#save-btn').click(function () {
  $('[name="published"]').val(false);
  $('#blog-form').submit();
});

$('#publish-btn').click(function () {
  $('[name="published"]').val(true);
  $('#blog-form').submit();
});
- 提交表单
<form id="blog-form" action="#" th:object="${blog}" th:action="*{id}==null ? @{/admin/blogs} : @{/admin/blogs/{id}(id=*{id})}" method="post" class="ui form">
    <input type="hidden" name="published" th:value="*{published}">
    <input type="hidden" name="id" th:value="*{id}">
    ......
</form>
- 分页查询
<div class="ui inverted divided stackable grid">
    <div class="three wide column" align="center">
      <a class="item" th:href="@{/admin/blogs(pageNum=${pageInfo.hasPreviousPage}?${pageInfo.prePage}:1)}" th:unless="${pageInfo.isFirstPage}">上一页</a>
    </div>

    <div class="ten wide column" align="center">
      <p>第 <span th:text="${pageInfo.pageNum}"></span> 页,共 <span th:text="${pageInfo.pages}"></span> 页,有 <span th:text="${pageInfo.total}"></span> 篇文章</p>
    </div>

    <div class="three wide column" align="center">
      <a class="item" th:href="@{/admin/blogs(pageNum=${pageInfo.hasNextPage}?${pageInfo.nextPage}:${pageInfo.pages})}" th:unless="${pageInfo.isLastPage}">下一页</a>
    </div>
</div>
8. 运行访问
运行项目,访问 http://localhost:8080/admin, 登录后点击文章管理,点击新增按钮,跳转新增页面,可以新增博文,发布后跳转博客列表,并查询出文章信息。

三、博客删除
分析:
问:博客删除delete删除,一条SQL语句就可以了吗?
答:删除比较简单,实现功能的话直接delete就可以了,但要考虑到删除后还要跳转到博客列表,因此还要重定向到博客列表查询
1.删除持久层接口
在BlogDao接口中添加:
//删除博客
void deleteBlog(Long id);
2. 删除mapper
在BlogDao.xml中添加:
<!--删除文章-->
<delete id="deleteBlog">
    delete from myblog.t_blog where id = #{id}
</delete>
3. 删除业务层
- 删除业务层接口
在BlogService接口中添加:
//删除博客
void deleteBlog(Long id);
- 删除业务层接口实现
在BlogServiceImpl类中添加:
//删除博客
@Override
public void deleteBlog(Long id) {
    blogDao.deleteBlog(id);
}
4. 删除控制器
在BlogController类中添加:
//删除博客
@GetMapping("/blogs/{id}/delete")
public String delete(@PathVariable Long id, RedirectAttributes attributes) {
    blogService.deleteBlog(id);
    attributes.addFlashAttribute("message", "删除成功");
    return "redirect:/admin/blogs";
}
讲解:
- @GetMapping("/blogs/{id}/delete"):路径参数传递,{id}为需要传递进去的id值
- return "redirect:/admin/blogs":用于controller之间的跳转,重定向到查询博客列表
5. 前后端交互
<a href="#" th:href="@{/admin/blogs/{id}/delete(id=${blog.id})}" onclick="return confirm('确定要删除该文章吗?三思啊! 删了可就没了!')" class="ui mini red basic button">删除</a>
6. 运行访问
运行项目,访问 http://localhost:8080/admin, 登录后点击文章管理,点击删除按钮,可以删除文章,并有删除成功的提示
四、博客编辑
分析:
问:博客编辑需要考虑哪些问题?
答:跳转编辑页面的时候需要知道是编辑的哪篇文章,将博客的id传递给后端,并且为了用户体验,需要将要修改的数据一并传过去在前端显示出来
问:那要如何编写呢?
答:首先为了简化查询,可以单独创建博客显示类:BlogShow类,查询出需要编辑的博客信息,并使用getBlogById(id)查询出需要编辑修改的博客
1. 创建编辑修改文章实体类
在queryvo包下创建ShowBlog实体类:
package com.cbx.queryvo;

import lombok.AllArgsConstructor;
import lombok.Data;
import lombok.NoArgsConstructor;

import java.util.Date;

/**
 * @author cbx
 * @date 2022/3/3
 * @apiNote 编辑修改文章实体类
 */
@Data
@AllArgsConstructor
@NoArgsConstructor
public class ShowBlog {

    private Long id;
    private String flag;
    private String title;
    private String content;
    private Long typeId;
    private String firstPicture;
    private String description;
    private boolean recommend;
    private boolean published;
    private boolean shareStatement;
    private boolean appreciation;
    private boolean commentabled;
    private Date updateTime;

}
2. 博客编辑持久层
在BlogDao接口中添加:
//编辑博客
int updateBlog(ShowBlog showBlog);

//查询编辑修改的文章
ShowBlog getBlogById(Long id);
3.博客编辑mapper
在BlogDao下添加:
<!--查询编辑修改的文章-->
<select id="getBlogById" resultType="com.cbx.queryvo.ShowBlog">
    select b.id,b.flag,b.title,b.content,b.type_id,
    b.first_picture,b.description,b.recommend,b.published,b.share_statement,
    b.appreciation,b.commentabled from myblog.t_blog b  where  b.id = #{id};
</select>

<!--编辑修改文章-->
<update id="updateBlog" parameterType="com.cbx.queryvo.ShowBlog">
    update myblog.t_blog set published = #{published},flag = #{flag} ,
    title = #{title}, content = #{content}, type_id = #{typeId},
    first_picture = #{firstPicture} , description = #{description} , recommend = #{recommend} ,
    share_statement = #{shareStatement}, appreciation = #{appreciation},
    commentabled = #{commentabled} ,update_time = #{updateTime} where id = #{id};
</update>
4.博客修改业务层
- 业务层接口
在BlogService下添加:
//查询编辑修改的文章
ShowBlog getBlogById(Long id);

//编辑修改文章
int updateBlog(ShowBlog showBlog);
- 接口实现类:
//查询编辑修改的文章
@Override
public ShowBlog getBlogById(Long id) {
    return blogDao.getBlogById(id);
}

//编辑修改文章
@Override
public int updateBlog(ShowBlog showBlog) {
    showBlog.setUpdateTime(new Date());
    return blogDao.updateBlog(showBlog);
}
5. 博客修改控制器
在BlogController添加:
//跳转编辑修改文章
@GetMapping("/blogs/{id}/input")
public String editInput(@PathVariable Long id, Model model) {
    ShowBlog blogById = blogService.getBlogById(id);
    List<Type> allType = typeService.getAllType();
    model.addAttribute("blog", blogById);
    model.addAttribute("types", allType);
    return "admin/blogs-input";
}

//编辑修改文章
@PostMapping("/blogs/{id}")
public String editPost(@Valid ShowBlog showBlog, RedirectAttributes attributes) {
    int b = blogService.updateBlog(showBlog);
    if(b == 0){
        attributes.addFlashAttribute("message", "修改失败");
    }else {
        attributes.addFlashAttribute("message", "修改成功");
    }
    return "redirect:/admin/blogs";
}
6. 前后端交互
<a href="#" th:href="@{/admin/blogs/{id}/input(id=${blog.id})}" class="ui mini teal basic button">编辑</a>
7. 运行访问
运行项目,访问 http://localhost:8080/admin, 登录后点击文章管理,点击编辑按钮,跳转编辑博客页面,可以对文章进行编辑
五、搜索博客管理列表
分析:
问:搜索博客管理列表需要考虑哪些问题?
答:这里的搜索是使用的MySQL的模糊查询,根据博客标题和博客分类查询出想要搜索的文章,需要创建有标题和分类属性的实体类做vo查询
问:模糊查询如何操作
答:可以使用bind标签,bind标签可以使用OGNL表达式创建一个变量并将其绑定到上下文中
1. 创建搜索博客管理列表实体类
在queryvo包下创建SearchBlog实体类:
package com.cbx.queryvo;

import lombok.AllArgsConstructor;
import lombok.Data;
import lombok.NoArgsConstructor;

/**
 * @author cbx
 * @date 2022/3/3
 * @apiNote 搜索博客管理列表
 */
@Data
@AllArgsConstructor
@NoArgsConstructor
public class SearchBlog {

    private String title;
    private Long typeId;


}
2. 搜索博客管理列表持久层接口
在BlogDao接口中添加:
//搜索博客管理列表
List<BlogQuery> searchByTitleAndType(SearchBlog searchBlog);
3. 搜索博客管理列表mapper
在BlogDao.xml文件中添加:
<!--搜索博客管理列表-->
<select id="searchByTitleAndType" parameterType="com.cbx.queryvo.SearchBlog" resultMap="blog">
    <bind name="pattern" value="'%' + title + '%'" />
    select b.id,b.title,b.type_id,t.id,t.name from myblog.t_blog b ,myblog.t_type t
    <where>
        <if test="1 == 1">
            b.type_id = t.id
        </if>
        <if test="typeId != null">
            and b.type_id = #{typeId}
        </if>
        <if test="title != null">
            and b.title like #{pattern}
        </if>
    </where>
</select>
讲解:
- bind:bind标签可以使用OGNL表达式创建一个变量并将其绑定到上下文中
- name属性:为绑定到上下文的变量名
- value属性:为OGNL表达式
4. 搜索博客管理列表业务层
- 业务层接口 在BlogService下添加:
//搜索博客管理列表
List<BlogQuery> getBlogBySearch(SearchBlog searchBlog);
- 接口实现: 在BlogServiceImpl类中添加:
//搜索博客管理列表
@Override
public List<BlogQuery> getBlogBySearch(SearchBlog searchBlog) {
    return blogDao.searchByTitleAndType(searchBlog);
}
5. 搜索博客管理列表控制器
在BlogController类中添加:
//搜索博客管理列表
@PostMapping("/blogs/search")
public String search(SearchBlog searchBlog, Model model,
                     @RequestParam(defaultValue = "1",value = "pageNum") Integer pageNum) {
    List<BlogQuery> blogBySearch = blogService.getBlogBySearch(searchBlog);
    PageHelper.startPage(pageNum, 10);
    PageInfo<BlogQuery> pageInfo = new PageInfo<>(blogBySearch);
    model.addAttribute("pageInfo", pageInfo);
    return "admin/blogs :: blogList";
}
return "admin/blogs :: blogList"
thymeleaf的一个模板片断,相当于只返回数据到admin/blogs模板中的某个片段。
6. 前后端交互
<table th:fragment="blogList" class="ui compact teal table">
    ...
</table>
<!--搜索按键-->
<button  type="button" id="search-btn" class="ui mini teal basic button"><i class="search icon"></i>搜索</button>
<!--JS-->
$("#search-btn").click(function () {
      $("[name='page']").val(0);
      loaddata();
    });
function loaddata() {
  $("#table-container").load(/*[[@{/admin/blogs/search}]]*/"/admin/blogs/search",{
    title : $("[name='title']").val(),
    typeId : $("[name='typeId']").val(),
    page : $("[name='page']").val()
  });
}
7. 运行访问
运行项目,访问 http://localhost:8080/admin, 登录后点击文章管理,在标题框和分类框输入想要查询的文章,点击搜索,即可查询出想要查询的文章
至此,博客管理开发完成。


评论